Geocoding is the term used to describe the process of exchanging address into corresponding geographical data (coordinates).
If you’re looking for out-of-the-box geocoding services there are plenty of them. For example, you can consider the most popular one – Google Maps Geocoding API which is pretty good but it’s not really free to use.
There’s a different solution, especially if you’re using OpenStreetMaps-related maps engine. It’s called Nominatim and basically it’s the OSM searching engine with open web API.
In this article, I’m going to cover basic Nominatim API integration with Angular application which uses the Leaflet library for interactive maps.
Before starting, it’s important to remark that I’m going to focus on the most important areas only. So if you’re looking for a working example you can take a look at the GitHub repository I provided.
Let’s start
Okay, so let’s begin with basic Angular app initialization and map library (Leaflet) integration.
In order to do it, please take a look at this post it covers all the initial steps we will need to do.
The next step will be to prepare our app components and provide geocoding service integration (Nominatim).
Generating new components
This app will be rather simple. What we need is a map with a text input box, the results list, and the form with map point name and coordinates.
We would need the following components:
- MapComponent – which will contain a Leaflet map, it will be the master component
- GeocodingComponent – which will handle geocoding input and API integration
- ResultsListComponent – which will handle results from geocoding API
- MapPointFormComponent – which will contain information about selected map point
We have already generated MapComponent during the initial steps so let’s generate missing components with Angular CLI.
ng generate component geocoding
ng generate component map-point-form
ng generate component results-list
Define the output – MapPoint class
The end result of the geocoding operation should be a MapPoint object.
Let’s create map-point.model.ts file in /src/app/shared/models directory.
export class MapPoint {
  name: string;
  latitude: number;
  longitude: number;
}
As you can see we need the point’s name with geocoordinates – latitude and longitude.
Starting with geocoding
Let’s start with Nominatim integration. First of all, you can take a look at its docs or test it live. For the purpose of this article, we’re going to use /search endpoint.
Take a look at the response object for GET /search?format=json&q=bakery+in+london example query.
[
...
  {
    "place_id": 102184333,
    "licence": "Data © OpenStreetMap contributors, ODbL 1.0. https://osm.org/copyright",
    "osm_type": "way",
    "osm_id": 72140283,
    "boundingbox": [
      "51.5100444",
      "51.510125",
      "-0.1220874",
      "-0.1219531"
    ],
    "lat": "51.5100858",
    "lon": "-0.12202148961423442",
    "display_name": "Paul, 80, Strand, St Clement Danes, Covent Garden, City of Westminster, London, Greater London, England, WC2R 0DW, United Kingdom",
    "class": "shop",
    "type": "bakery",
    "importance": 0.501,
    "icon": "https://nominatim.openstreetmap.org/images/mapicons/shopping_bakery.p.20.png"
  }
...
]
As you can see we’ve got plenty of data over here. For our MapPoint class, we will need just lat (latitude), lon (longitude), and display_name fields.
So let’s write a basic service which will responsible for communication with Nominatim API.
Create nominatim-service.ts file in /src/app/services directory.
import {Injectable} from '@angular/core';
import {HttpClient} from '@angular/common/http';
import {Observable} from 'rxjs';
import {NominatimResponse} from '../shared/models/nominatim-response.model';
import {map} from 'rxjs/operators';
import {BASE_NOMINATIM_URL, DEFAULT_VIEW_BOX} from '../app.constants';

@Injectable()
export class NominatimService {

  constructor(private http: HttpClient) {
  }

  addressLookup(req?: any): Observable<NominatimResponse[]> {
    let url = `https://${BASE_NOMINATIM_URL}/search?format=json&q=${req}&${DEFAULT_VIEW_BOX}&bounded=1`;
    return this.http
      .get(url).pipe(
        map((data: any[]) => data.map((item: any) => new NominatimResponse(
          item.lat,
          item.lon,
          item.display_name
          ))
        )
      )
  }

}
nominatim-service.ts
As you can see I have delegated some of the constants into a separate file (app.constants.ts) in order to keep the service file clean.
Here’s an excerpt from the constants file:
export const BASE_NOMINATIM_URL: string = 'nominatim.openstreetmap.org';
export const DEFAULT_VIEW_BOX: string = 'viewbox=-25.0000%2C70.0000%2C50.0000%2C40.0000';
app.constants.ts
Apart from the root URL for API, I used the default view box (which roughly covers Europe) in order to get the results only from this territory.
Please note that if you’d like Nominatim to respect this view box, you have to provide bounded=1 parameter in the path.
Anyway, let’s focus on the NominatimService code now.
As you can see, there’s nothing more than just basic HttpClient usage.
Another thing is that I didn’t want to use properties I receive straight from the API, so I provided NominatimResponse wrapper class with my own fields and transformed response objects into my own using map operator inside pipe function.
We will use them for displaying the results list.
Take a look at nominatim-response.model.ts (located in /src/app/shared/models)
export class NominatimResponse {
  constructor(
    public latitude: number,
    public longitude: number,
    public displayName: string
  ) { }
}
nominatim-response.model.ts
Start searching
It’s time to see our NominatimService in action. Don’t forget to place it in providers in AppModule (/src/app/app.module.ts).
Now, let’s move into GeocodingComponent (/src/app/geocoding/geocoding.component.ts).
First of all, let’s define EventEmitter and declare searchResults array.
@Output() onSearch = new EventEmitter();
searchResults: NominatimResponse[];
geocoding.component.ts
onSearch will later be used to emit the searchResults into ResultsListComponent.
If you’re not familiar with the concepts of @Output decorators and EventEmitters you can read about them on my blog.
We have to inject NominatimService in the constructor as well. The purpose is to trigger the request sending when the string entered by the user in the text input element will be longer than 3 characters.
The entire file will look like this:
import {Component, EventEmitter, Output} from '@angular/core';
import {NominatimService} from '../services/nominatim-service';
import {NominatimResponse} from '../shared/models/nominatim-response.model';

@Component({
  selector: 'app-geocoding',
  templateUrl: './geocoding.component.html',
  styleUrls: ['./geocoding.component.scss']
})
export class GeocodingComponent {

  @Output() onSearch = new EventEmitter();
  @Output() locationSelect = new EventEmitter();
  searchResults: NominatimResponse[];

  constructor(private nominatimService: NominatimService) {
  }

  addressLookup(address: string) {
    if (address.length > 3) {
      this.nominatimService.addressLookup(address).subscribe(results => {
        this.searchResults = results;
      });
    } else {
      this.searchResults = [];
    }
    this.onSearch.emit(this.searchResults);
  }

}
geocoding.component.ts
The addressLookup function will be triggered in the HTML template of this component.
<div class="address-lookup">
  <input type="text" placeholder="Search..."
         (keyup)="addressLookup($event.target.value)" (click)="$event.stopPropagation()"/>
</div>
geocoding.component.html
As you can see, addressLookup function is being triggered here on keyup event. So it occurs every time when the user presses and releases a key.
We also need (click)=”$event.stopPropagation()” which is a workaround to avoid Leaflet map clicking event propagation when we click on input element.
When it comes to styling, address-lookup CSS class contains just a single rule:
.address-lookup {
  cursor: pointer;
}
geocoding.component.scss
It’s just a small detail but it in my opinion it gives the user a better experience.
Pass search results into map component
We will handle onSearch event emitted in GeocodingComponent a little bit later. Now, let’s go back to MapComponent. It’s time to provide a results array there.
results: NominatimResponse[];
map.component.ts
In order to set the value into this variable, we will use this simple method called refreshSearchList.
 refreshSearchList(results: NominatimResponse[]) {
   this.results = results;
 }
map.component.ts
Now we can use it MapComponent template file:
<div id="map" leaflet ... >
 <div class="leaflet-bottom leaflet-left">
  <app-geocoding (onSearch)="refreshSearchList($event)"></app-geocoding>
 </div>
</div>
map.component.html
We would like to place the text field over the map, in the bottom left corner of it.
To achieve it we use leaflet-bottom and leaflet-left CSS classes provided out-of-the-box by Leaflet.
Preparing results list component
We won’t process the results data in MapComponent. We want to pass them into one of the child components – ResultsListComponent.
import {Component, EventEmitter, Input, Output} from '@angular/core';
import {NominatimResponse} from '../shared/models/nominatim-response.model';

@Component({
  selector: 'app-results-list',
  templateUrl: './results-list.component.html',
  styleUrls: ['./results-list.component.scss']
})
export class ResultsListComponent {

  @Input()
  results: NominatimResponse[];

  @Output()
  locationSelected = new EventEmitter();

  constructor() {
  }

  selectResult(result: NominatimResponse) {
    this.locationSelected.emit(result);
  }

}
results-list.component.ts
We used @Input decorator here and previously used @Output with EventsEmitter.
The former will be used for receiving data from the external component (in this case from MapComponent), the latter will be used for events emitting when the user selects the result object from the list.
HTML template for this component contains a list that will be populated from the results array. We will use selectResult method on click event.
<div id="results-list">
  <h3>Results</h3>
  <div id="results">
    <ul>
      <li *ngFor="let result of results" (click)="selectResult(result)">
        {{ result.displayName }}
      </li>
    </ul>
  </div>
</div>
results-list.component.html
Include ResultsListComponent selector into the map.component.html:
<div id="details-panel">
  <app-results-list [results]="results" (locationSelected)="getAddress($event)"></app-results-list>
</div>
map.component.html
As you can see we passed results into ResultsListComponent and we want to trigger getAddress on locationSelected event.
Display selected object on the map
Let’s implement getAddress method along with a handful of other stuff that will help us render the marker on the map.
...

@Component({
  selector: 'app-map',
  templateUrl: './map.component.html',
  styleUrls: ['./map.component.scss']
})
export class MapComponent implements OnInit {

  map: Map;
  mapPoint: MapPoint;
  options: MapOptions;
  lastLayer: any;

  results: NominatimResponse[];

  constructor() {
  }

  ...

  getAddress(result: NominatimResponse) {
    this.updateMapPoint(result.latitude, result.longitude, result.displayName);
    this.createMarker();
  }

  ...

  private updateMapPoint(latitude: number, longitude: number, name?: string) {
    this.mapPoint = {
      latitude: latitude,
      longitude: longitude,
      name: name ? name : this.mapPoint.name
    };
  }

  private createMarker() {
    this.clearMap();
    const mapIcon = this.getDefaultIcon();
    const coordinates = latLng([this.mapPoint.latitude, this.mapPoint.longitude]);
    this.lastLayer = marker(coordinates).setIcon(mapIcon).addTo(this.map);
    this.map.setView(coordinates, this.map.getZoom());
  }

  private getDefaultIcon() {
    return icon({
      iconSize: [25, 41],
      iconAnchor: [13, 41],
      iconUrl: 'assets/marker-icon.png'
    });
  }

  private clearMap() {
    if (this.map.hasLayer(this.lastLayer)) this.map.removeLayer(this.lastLayer);
  }

}
map.component.ts
At this point, you’ll be able to search for the object and display the chosen one on the map.
But in order to get a complete picture, we’ll provide the form for the MapPoint object.
Providing the form
MapPointForm code is pretty simple:
import {Component, Input} from '@angular/core';
import {MapPoint} from '../shared/models/map-point.model';

@Component({
  selector: 'app-map-point-form',
  templateUrl: './map-point-form.component.html',
  styleUrls: ['./map-point-form.component.scss']
})
export class MapPointFormComponent {
  @Input()
  mapPoint: MapPoint;

  constructor() { }

}
map-point-form.component.ts
It receives the MapPoint object from the MapComponent.
We will display it in the template of this component:
<div id="map-point-form">
  <h3>Form</h3>
  <div><label for="name">Name: </label>
    <input type="text" id="name" name="name" [(ngModel)]="mapPoint.name"/>
  </div>
  <div><label for="longitude">Longitude: </label>
    <input type="text" id="longitude" name="longitude" disabled="true" [ngModel]="mapPoint.longitude"/>
  </div>
  <div><label for="latitude">Latitude: </label>
    <input type="text" id="latitude" name="latitude" disabled="true" [ngModel]="mapPoint.latitude"/>
  </div>
</div>
map-point-form.component.html
Of course, it isn’t a proper HTML form element but there is no need to use it.
It’s enough for purpose of this article.
Let’s put everything together.
Wrapping it up
Let’s see how we gonna use everything in MapComponent template.
Take a look at the template code:
<div>
  <div id="map"
       leaflet
       (leafletMapReady)="initializeMap($event)"
       [leafletOptions]="options"
       (leafletClick)="onMapClick($event)">
    <div class="leaflet-bottom leaflet-left">
      <app-geocoding (onSearch)="refreshSearchList($event)"></app-geocoding>
    </div>
  </div>
</div>
<div id="details-panel">
  <app-results-list [results]="results" (locationSelected)="getAddress($event)"></app-results-list>
  <app-map-point-form [mapPoint]="mapPoint"></app-map-point-form>
</div>
map.component.html
And the final MapComponent code should look like this one:
import {Component, OnInit} from '@angular/core';
import {icon, latLng, LeafletMouseEvent, Map, MapOptions, marker, tileLayer} from 'leaflet';
import {DEFAULT_LATITUDE, DEFAULT_LONGITUDE} from '../app.constants';
import {MapPoint} from '../shared/models/map-point.model';
import {NominatimResponse} from '../shared/models/nominatim-response.model';

@Component({
  selector: 'app-map',
  templateUrl: './map.component.html',
  styleUrls: ['./map.component.scss']
})
export class MapComponent implements OnInit {

  map: Map;
  mapPoint: MapPoint;
  options: MapOptions;
  lastLayer: any;

  results: NominatimResponse[];

  constructor () {
  }

  ngOnInit () {
    this.initializeDefaultMapPoint();
    this.initializeMapOptions();
  }

  initializeMap (map: Map) {
    this.map = map;
    this.createMarker();
  }

  getAddress (result: NominatimResponse) {
    this.updateMapPoint(result.latitude, result.longitude, result.displayName);
    this.createMarker();
  }

  refreshSearchList (results: NominatimResponse[]) {
    this.results = results;
  }

  private initializeMapOptions () {
    this.options = {
      zoom: 12,
      layers: [
        tileLayer('http://{s}.tile.openstreetmap.org/{z}/{x}/{y}.png', {maxZoom: 18, attribution: 'OSM'})
      ]
    }
  }

  private initializeDefaultMapPoint () {
    this.mapPoint = {
      name: 'Hello',
      latitude: DEFAULT_LATITUDE,
      longitude: DEFAULT_LONGITUDE
    };
  }

  private onMapClick (e: LeafletMouseEvent) {
    this.clearMap();
    this.updateMapPoint(e.latlng.lat, e.latlng.lng);
    this.createMarker();
  }

  private updateMapPoint (latitude: number, longitude: number, name?: string) {
    this.mapPoint = {
      latitude: latitude,
      longitude: longitude,
      name: name ? name : this.mapPoint.name
    };
  }

  private createMarker () {
    this.clearMap();
    const mapIcon = this.getDefaultIcon();
    const coordinates = latLng([this.mapPoint.latitude, this.mapPoint.longitude]);
    this.lastLayer = marker(coordinates).setIcon(mapIcon).addTo(this.map);
    this.map.setView(coordinates, this.map.getZoom());
  }

  private getDefaultIcon () {
    return icon({
      iconSize: [25, 41],
      iconAnchor: [13, 41],
      iconUrl: 'assets/marker-icon.png'
    });
  }

  private clearMap () {
    if (this.map.hasLayer(this.lastLayer)) this.map.removeLayer(this.lastLayer);
  }

}
As you can see there’s additional code for providing some improvements like default MapPoint, handling click event and marker or icon creation, etc.
Basically it’s ready to go now.
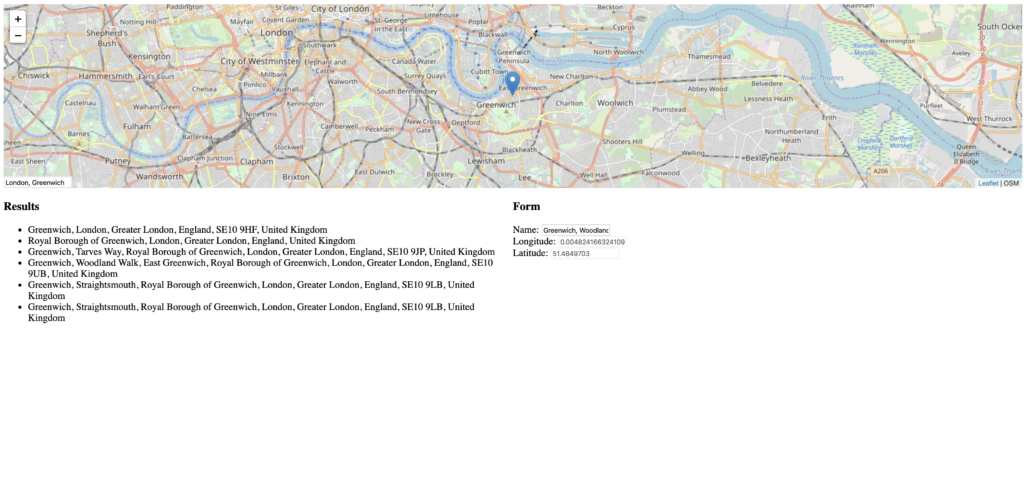
See the map in action
Before running the project don’t forget to replace auto-generated welcome page content in app.component.html with app-map component selector.
<app-map></app-map>
app.component.html
Now you’re able to run Angular app.
Browse to http://localhost:4200 and feel free to use the map.
Conclusion
Now you’re able to use Nominatim API for geocoding with Leaflet map in your Angular app. Althought this geocoding service isn’t perfect, it should do the job in the most common use cases.
The source code used in this article can be found on GitHub.
Good luck!
Resources
For more detailed information please refer to the docs: